This topic provides the requirements and procedures to install a 1 Watt Repeater Transmitter with an internal antenna.
For a system with more than one Transmitter, first configure and install the main Transmitter and verify it received a valid time signal and then configure Repeater Transmitters. When all Transmitters are configured and installed, you can then configure and install the system clocks or InfoBoards.
When planning the system installation of a Transmitter with an internal antenna, Primex recommends taking into consideration the below requirements. Location is extremely important to ensure the best operation of your system.
Location and mounting must meet all of the following requirements.
Multi-story building: locate the main Transmitter on the top floor; significantly improves coverage to the lower floors due to the “umbrella” pattern of transmission.
Transmitter mounting location: a minimum of 4 ft. (1.2 m) above the floor.
Transmitter shelf mounting: 18 in. L x 3 in. W x 16.5 in. (45.72 cm x 7.63 cm x 41.91 cm) mounting shelf available from Primex.
-
Transmitter enclosure clearance: located in an area that allows for required clearance.
Enclosure dimension: 2 in. H x 17 in. W x 12 in. D (5.08 cm x 43.18 cm x 30.48 cm). Required wall area is 24 in. W x 18 in D (60.96 cm x 45.72 cm).
Allow a minimum of 43 in. (1.09 m) vertical clearance; includes internal antenna 40.8 in. H (1.03 m) and Transmitter enclosure height of 2 in. (5.08 cm).
Internal antenna clearance: requires vertical clearance and distance of a minimum 5 ft. (1.5 m) from large, solid objects, such as lockers or filing cabinets. Antenna should never make contact with metal objects, especially electrical conduit or wiring of any kind, and proximity to these should be avoided. Internal Antenna height: 40.8 in. (1.03 m).
-
AC power: located within 5 ft. (1.5 m) from a 120 VAC electrical outlet. 10 AMP dedicated service recommended.
AC power supply (supplied): Input 120 VAC, 50/60 Hz, 0.6 Amp. Output 9 VDC, 1.78 Amp. 6 ft. (1.83 m) cord.
Ethernet connection (OneVue Monitor and NTP time source): located in close proximity to an Ethernet port.
Environment: located in an indoor controlled environment that is 32° to 122° F (0° to 50° C) and a non-condensing humidity environment.

-
Attach the internal antenna. The supplied antenna is attached to the top case of the Transmitter.
Carefully screw the supplied internal antenna onto the Transmitter. Turn the antenna clockwise, being careful to avoid cross-threading the antenna. The antenna must be snug and flat against the case.
-
Establish an Ethernet connection (NETWORK LAN). Required for NTP time source and OneVue Monitor configuration.
Insert a network cable into the RJ-45 Ethernet port/Network LAN port. Plug the other end into a network Ethernet jack.
-
Connect AC power.
Connect the supplied AC power supply into the Transmitter AC power input. Plug the two-prong plug into a 120 VAC wall outlet.
The last step is to configure the Transmitter with the OneVue Device Configurator (ODC) app. A Transmitter will not operate until it's configured.
OneVue Sync Transmitters can be configured for OneVue Monitor or for Standalone use. To receive remote support services from Primex, OneVue Monitor configuration is required. For Transmitters that are part of a OneVue Monitor subscription, they must be configured for OneVue Monitor use.
Learn how to configure a OneVue Sync Transmitter, with the OneVue Device Configurator (ODC) app, that will be managed and monitored from OneVue. Be sure to complete the steps in the order as they appear below.
For a system with more than one Transmitter, first configure and install the main Transmitter and verify it received a valid time signal and then configure Repeater Transmitters. When all Transmitters are configured and installed, you can then configure and install the system clocks or InfoBoards.
Transmitter: all external components are installed (external antenna, GPS Receiver). All connections are established and Transmitter is powered on.
App log in access: your OneVue user profile is assigned to the Account Admin or Network Admin role.
Network connection: OneVue Network Requirements are met (network port and firewall requirements).
OneVue Network Profile: you have the option to assign the Transmitter to a OneVue wired network profile or create a new network profile. For a Non-DHCP network, an IPv4 address required.
-
NTP time source: NTP Server IP address or URLs (up to three allowed).
The main Transmitter requires connection to wired Ethernet network. If the Ethernet network is a Non-DCHP network, the IPv4 network settings are required during configuration.
Port UDP 123 is required to be open for use with an external Network Time Protocol (NTP) Server. The use of an internal an NTP Server is also supported.
Get the Primex OneVue Device Configurator (ODC) app from the Apple App Store or Google Play store. If you already have the app, turn on automatic updates or check for updates.
-
From your mobile device, open the OneVue Device Configurator (ODC) app .

Select Connect to OneVue.
Enter your OneVue username > select Next > enter your password > select Log In.
-
Select the OneVue account the Transmitter is to be added to.
If your user login is associated with more than one OneVue account, the account selection option is displayed.
-
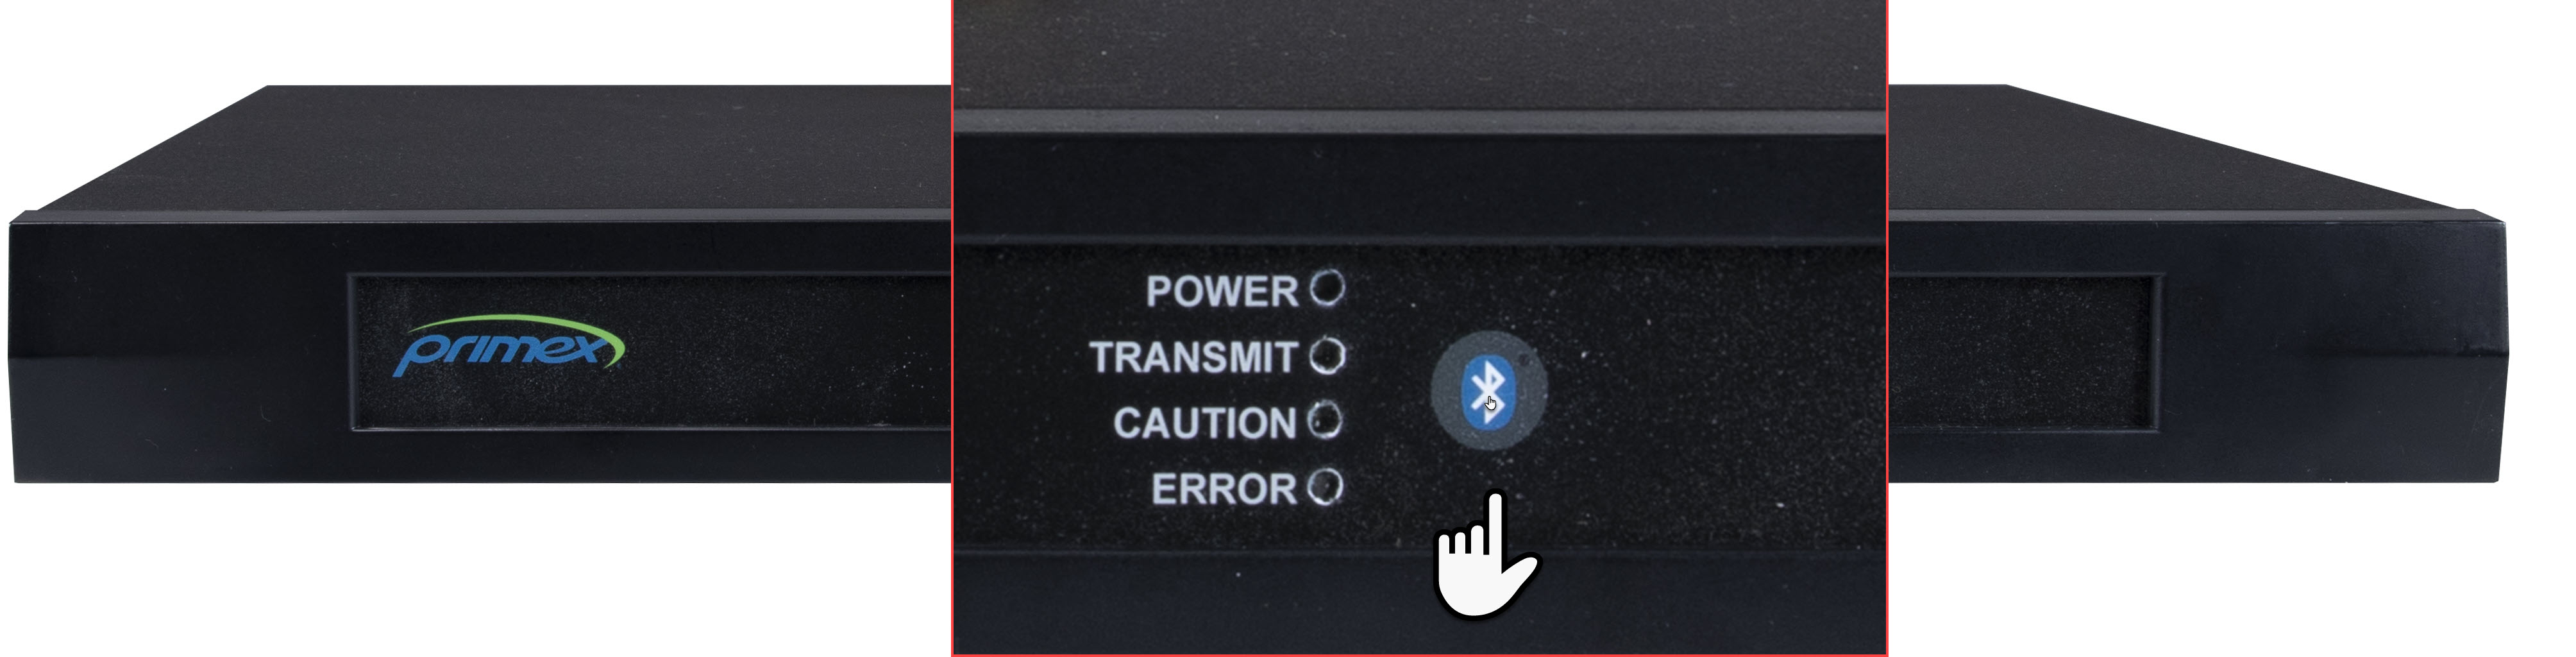
Set the Transmitter into Bluetooth discoverable mode.
From the Transmitter front panel, press and release the Bluetooth pairing button. The Transmitter is discoverable for the next two minutes (Power LED is illuminated and Transmit LED flashes).
-
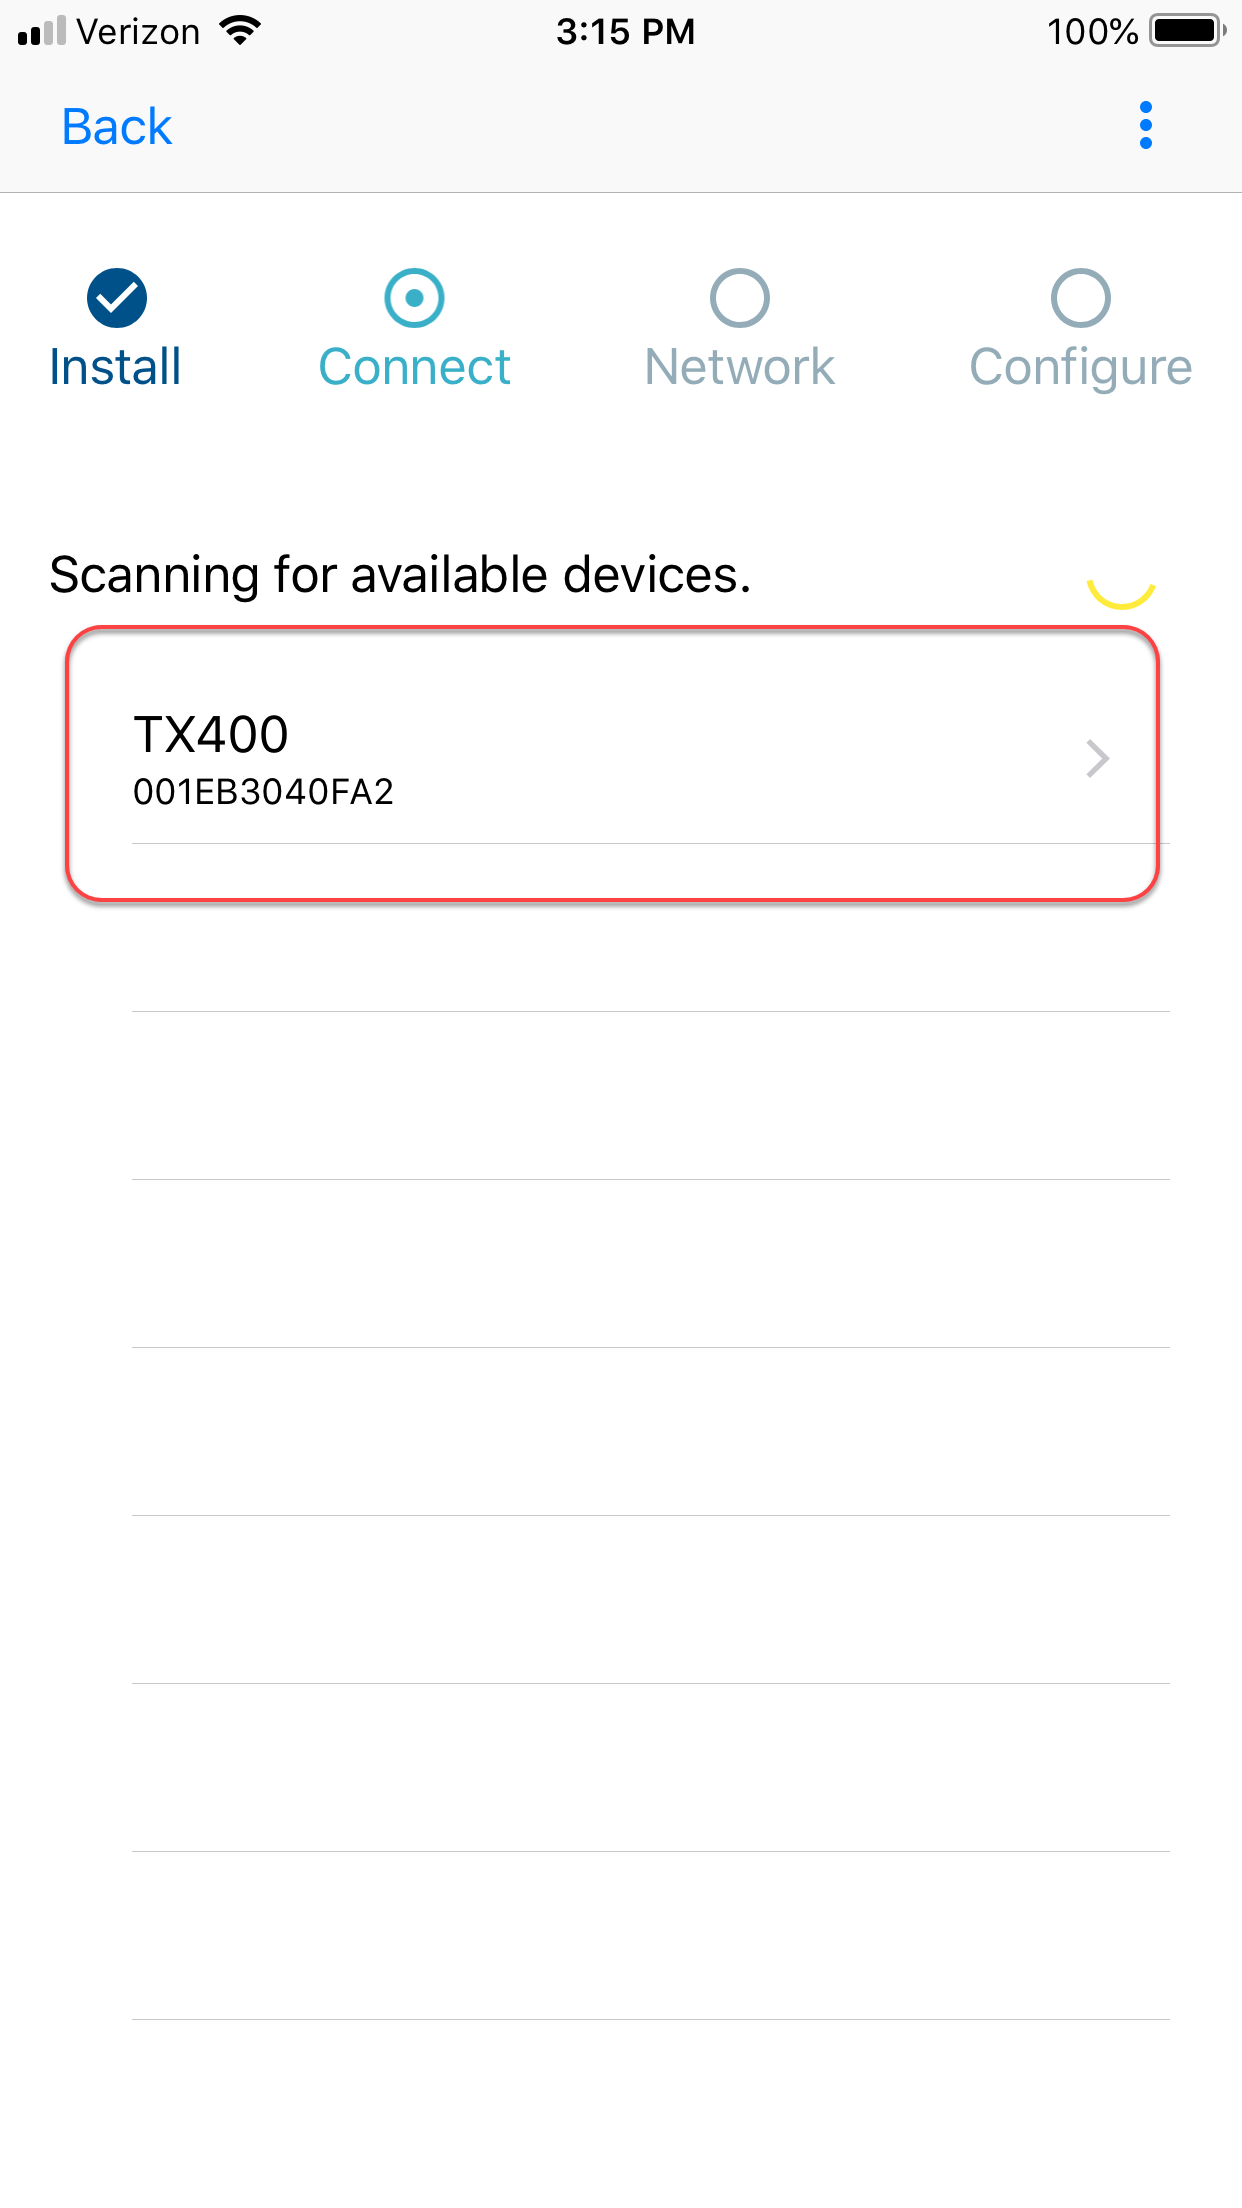
From available devices, select the Transmitter. If multiple devices are listed, verify the 12-character MAC address located on the Transmitter back panel.
If the Transmitter is not listed, select the app Refresh icon.
-
Configure its Network: select an existing network or enter a new network > select Continue.
If a Non-DHCP network (static IP address), select DHCP off and enter the IPv4 settings.
-
Verify its Device Details.
Serial No: unique 12-character MAC Address discoverable on the facility's network. The MAC address is printed on a label located on the Transmitter's back panel.
Model: identifies the Primex device model. All OneVue Sync Transmitters are identified by Transmitter (TX400).
Tx Mode: identifies the Transmitter hardware configuration. Indicates if 1, 5, or 30 Watt and internal or external antenna.
-
Enter a Name for the Transmitter.
-
Verify the Call Sign (preset by Primex).
-
Configure its Time Settings.
-
Main Transmitter only
Time Zone: set to the install location.
Time source: app detects GPS or NTP (Ethernet connection) time source.
-
Repeater Transmitter only (time settings do to not apply)
Time Zone: Repeater Transmitter receives a time from the main Transmitter.
Time source: displays Repeater detected, using main Transmitter time.
-
-
Configure its RF Settings.
-
Optional settings, select Advanced.
Caution
The settings below (Startup Continuous Transmit and Normal Transmit) should only be changed when requested or approved by an authorized Primex support technician.
Warning
The firmware setting is only to be configured or updated when instructed by Primex Technical Support.
-
Select Save.
Settings are downloaded to the Transmitter and initiates its first-time check-in to OneVue.
-
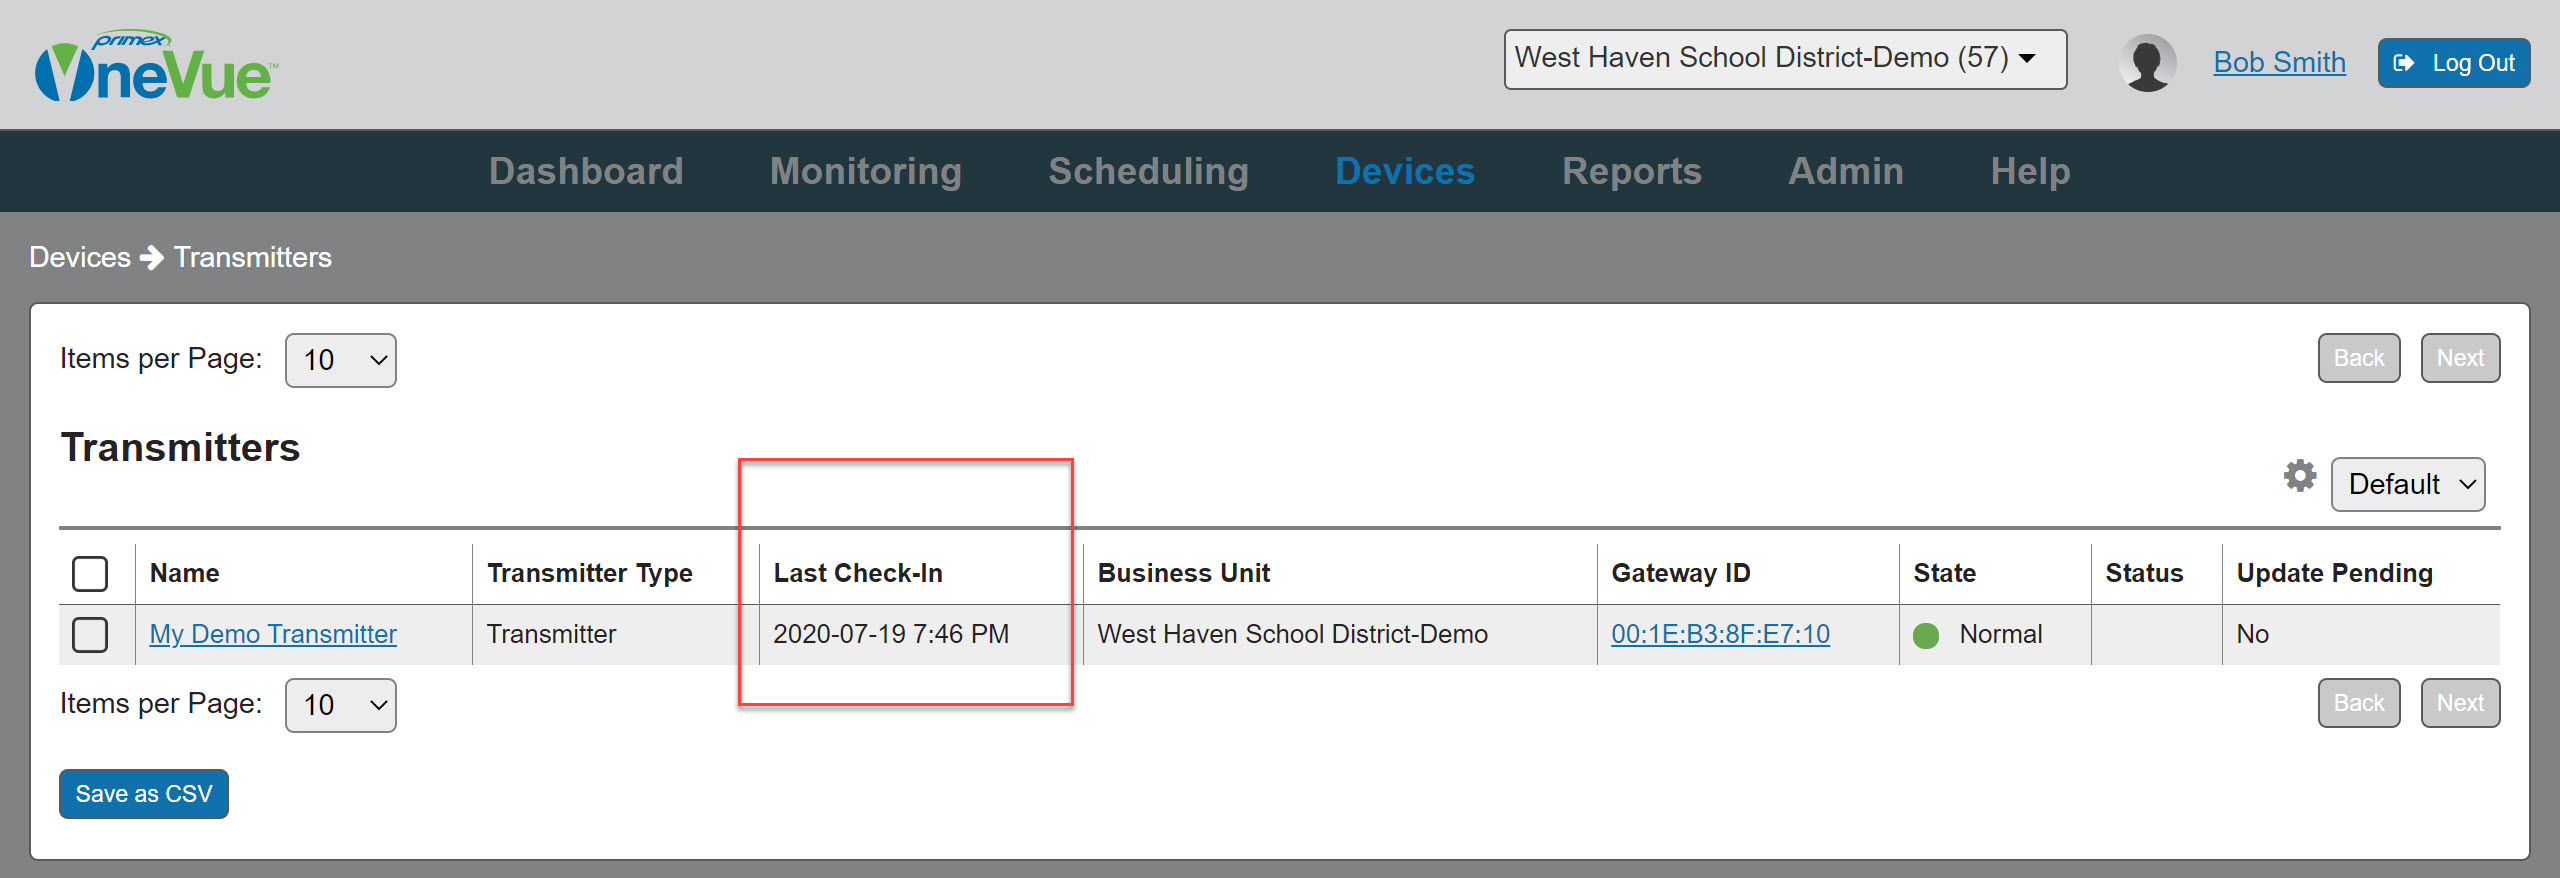
Verify the Transmitter checked-in to OneVue. It may take up to two minutes to check-in.
Log in to OneVue > go to Devices > Transmitters > verify its Last Check-in.
-
From the front of the Transmitter, verify it is not in a Caution or Error state.
This topic provide the steps to configure a Transmitter for standalone use. Standalone use indicates a Transmitter will be not monitored from OneVue. Be sure to complete the steps in the order as they appear below.
For a system with more than one Transmitter, first configure and install the main Transmitter and verify it received a valid time signal and then configure Repeater Transmitters. When all Transmitters are configured and installed, you can then configure and install the system clocks or InfoBoards.
Before you begin, verify the requirements below are met.
Transmitter: all external components are installed (external antenna, GPS Receiver). All connections are established and Transmitter is powered on.
-
NTP time source: NTP Server IP address or URLs (up to three allowed).
The main Transmitter requires connection to wired Ethernet network. If the Ethernet network is a Non-DCHP network, the IPv4 network settings are required during configuration.
Port UDP 123 is required to be open for use with an external Network Time Protocol (NTP) Server. The use of an internal an NTP Server is also supported.
Get the Primex OneVue Device Configurator (ODC) app from the Apple App Store or Google Play store. If you already have the app, turn on automatic updates or check for updates.
-
Open the ODC app.
Select Standalone Configuration.
Select CONFIGURE DEVICE.
-
Set the Transmitter into Bluetooth discoverable mode.
From the Transmitter front panel, press and release the Bluetooth pairing button. The Transmitter is discoverable for the next two minutes (Power LED is illuminated and Transmit LED flashes).
-
From available devices, select the Transmitter. If multiple devices are listed, the device can be identified by its 12-character MAC address located on its back panel.
If the Transmitter is not listed, select the app Refresh icon.
-
Confirm its network setting (DHCP ON by default) > select Continue.
For a Non-DHCP network, deselect DHCP On and enter the network settings.
-
Verify its Device Details.
Serial No: unique 12-character MAC Address discoverable on the facility's network. The MAC address is printed on a label located on the Transmitter's back panel.
Model: identifies the Primex device model. All OneVue Sync Transmitters are identified by Transmitter (TX400).
Tx Mode: identifies the Transmitter hardware configuration. Indicates if 1, 5, or 30 Watt and internal or external antenna.
-
Enter a Name for the Transmitter.
-
Verify its Call Sign (preset by Primex).
-
Configure its Time Settings.
-
Main Transmitter only
Time Zone: set to the install location.
Time source: app detects GPS or NTP (Ethernet connection) time source.
-
Repeater Transmitter only (time settings do to not apply)
Time Zone: Repeater Transmitter receives a time from the main Transmitter.
Time source: displays Repeater detected, using main Transmitter time.
-
-
Configure its RF Settings.
-
Optional settings, select Advanced.
Caution
The settings below (Startup Continuous Transmit and Normal Transmit) should only be changed when requested or approved by an authorized Primex support technician.
Warning
The firmware setting is only to be configured or updated when instructed by Primex Technical Support.
-
Select Save.
Settings are downloaded to the Transmitter.
-
From the front of the Transmitter, verify it is not in a Caution or Error state.
If in a Caution state, to determine the cause refer to topic Troubleshoot: Transmitter Caution status with ODC app.