Inspect the package contents to verify the supplied components are present and no damage has occurred during shipping.
Where a sensor is mounted impacts its use and operation. The install location critical to achieve the most accuracy and performance possible.
Install device on a wall at eye level, similar to a thermostat.
For an overall humidity reading for a room, it's important to install in a location that will not be exposed to hot humid air that may skew the results. For example, don’t install next to a piece of equipment that may exhaust hot air or near a scrub sink where hot water can give off steam.
Device is designed to be mounted on a wall. Lying a device on a counter may skew results.
Ensure area is free of obstructions that might prevent proper air flow.
Keep away from equipment that may exhaust hot air at the sensor.
Keep away from sinks or water sources that may create steam.
One humidity sensor can cover approximately 250 square feet – large rooms may require multiple sensors.
Avoid areas that are near a location that could cause an inaccurate reading, such as near air ducts, windows, exterior walls, or room entrances.
Avoid areas subject to excessive vibration, electrical noise, direct sunlight or the effects of radiant heat.
If using AC power, properly secure the cord to prevent snags.
Let the sensor stabilize for approximately 10 minutes after powering the device before using the reading results.
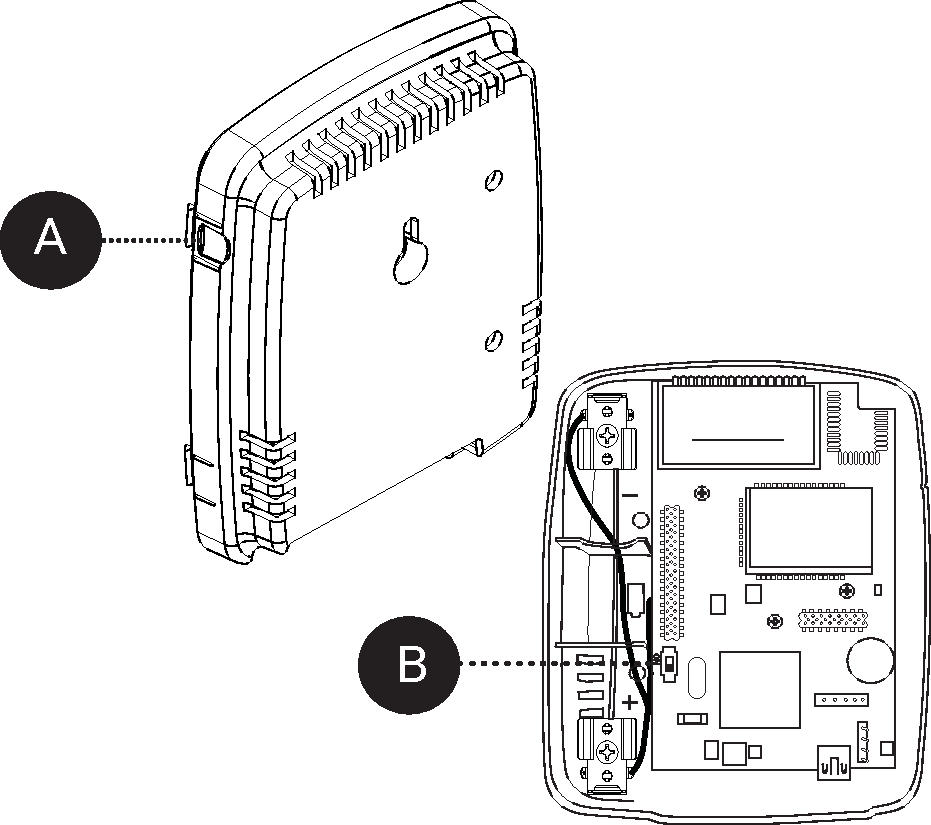
Remove the device cover; simultaneously press the two tabs located on the top side of the device (A).
Insert the 3.0v Primex Lithium/Iron Disulfide Battery Pack or two 1.5v Lithium AA batteries. Follow the symbols showing the correct way to position the positive (+) and negative (-) ends of the battery pack.
Located to the lower-right of the battery compartment, set the battery on/off switch to the Up (On) position (B).
-
Replace the device cover.
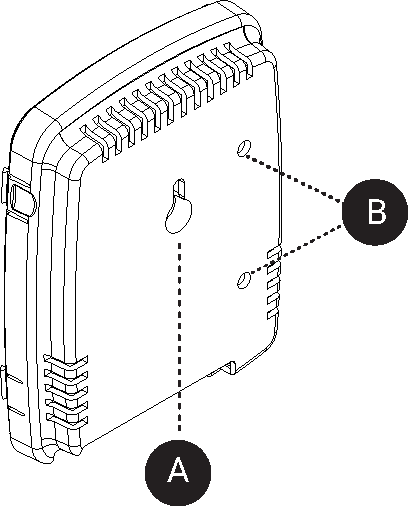
Mount sensor using either of the methods below.
Method |
Steps |
|
|---|---|---|
Wall mount |
Key-hole mount (A)
Two-screw mount (B)
|
|
|
Surface mount 3M™ Dual Lock Fastener & Tape, 2" x 1" strips |
|
Verify Signal OK is displayed on the LCD screen, which indicates it successfully checked-in. When power was applied, the sensor initiated a check-in to OneVue.
-
If Signal OK is not displayed, initiate a manual check-in. From the front of the sensor, press and quickly release the check-in button
 (up arrow). The sensor emits a series of audio beeps indicating its connection sequence. During an active check-in connection, additional pressing of the check-in button is ignored.
Verify the following settings are configured to meet the requirements of the condition being monitored.
-
Monitored Asset settings. Go to Monitoring > Monitored Assets.
Each Primex sensor is assigned to a Monitored Asset and its readings or monitored conditions generate the current and historical readings for the asset. In addition, sensor operating condition data is linked to its assigned Monitored Asset. When a sensor enters a Warning or Alarm state, its assigned Monitored Asset is also set to an Alarm or Warning state.
Sensor assigned to a Monitored Asset. Go to Devices > Sensors > select sensor > verify assigned Monitored Asset.
Monitored Asset assigned to sensor is added to an Alert Rule.
Monitored Asset assigned to sensor is added to a Report Profile.
Users responsible for the monitored condition are assigned to Monitored Asset's Business Unit.
-
Sensor settings (Go to Monitoring > Monitored Assets > select Monitored Asset > select sensor.
-
Normal Condition
The Normal Condition is the expected operating range or the condition of the Monitored Asset assigned to the sensor. The settings vary based on the type of sensor and the condition being monitored.
-
Alarm Delay
The Alarm Delay sets the amount of time OneVue delays setting the sensor and its assigned Monitored Asset to an Alarm state. When a sensor reading is not within its Normal Condition (an Out of Range status) and it remains Out of Range for the time period set in its Alarm Delay setting, the sensor and Monitored Asset are then set to an Alarm state with a status of Out of Range, Past Alarm Delay.
-
Audio Alert (sensor gateway setting)
Primex sensors are equipped with a reading alarm audio alert. The audio alert is activated when a reading is out of range and the time period it has been out of range has exceeded the time period set in its Alarm Delay. Be default, the audio alert is disabled.
-
Logging Interval (sensor gateway setting)
The Logging Interval is how frequent a sensor logs a reading and stores it into its internal memory. All logged readings are then sent to OneVue at the frequency set the sensor's Check-in Interval frequency.
-
Check-in Interval (sensor gateway setting)
The Check-in Interval is the frequency a sensor connects to the facility's network to send its logged readings to OneVue. Also during each check-in, pending setting updates are downloaded to the sensor.
-
Unresponsive Timeout (sensor gateway setting)
The Unresponsive Timeout is the maximum amount of time a Primex device can go without a check-in to OneVue. When this time limit is exceeded, the device is set to an Alarm state with an Unresponsive status.
-