The following information provides instructions for the most common tasks you'll perform when monitoring your assets and Primex sensors.
Be sure to activate your user account from the OneVue invitation email sent from support@primexonevue.com
Cannot find the email invitation? Check your spam or junk folder.
Email invitation is active for seven days. Did not activate in time? Select Forgot Password from the OneVue log in screen or contact your OneVue account admin to send a new invite.
No app required. Access to OneVue only requires an internet connection on a mobile device or computer.
OneVue automatically adjusts to your device screen size
From a web browser, set the OneVue log in page as a bookmark or favorite.
Forgot your password? From the log in screen, select “Forgot Password?” You will receive an email with instructions to reset your password.
You can log in to OneVue from any of the below web browsers. Be sure your browser is updated to the most current version.
Open a web browser on your computer or mobile device.
-
Enter your email address > select Log In > enter your password > select Log In.

The Dashboard provides a snapshot of the current state of all Monitored Assets, a To Do list of alerts and notifications, and User Announcements
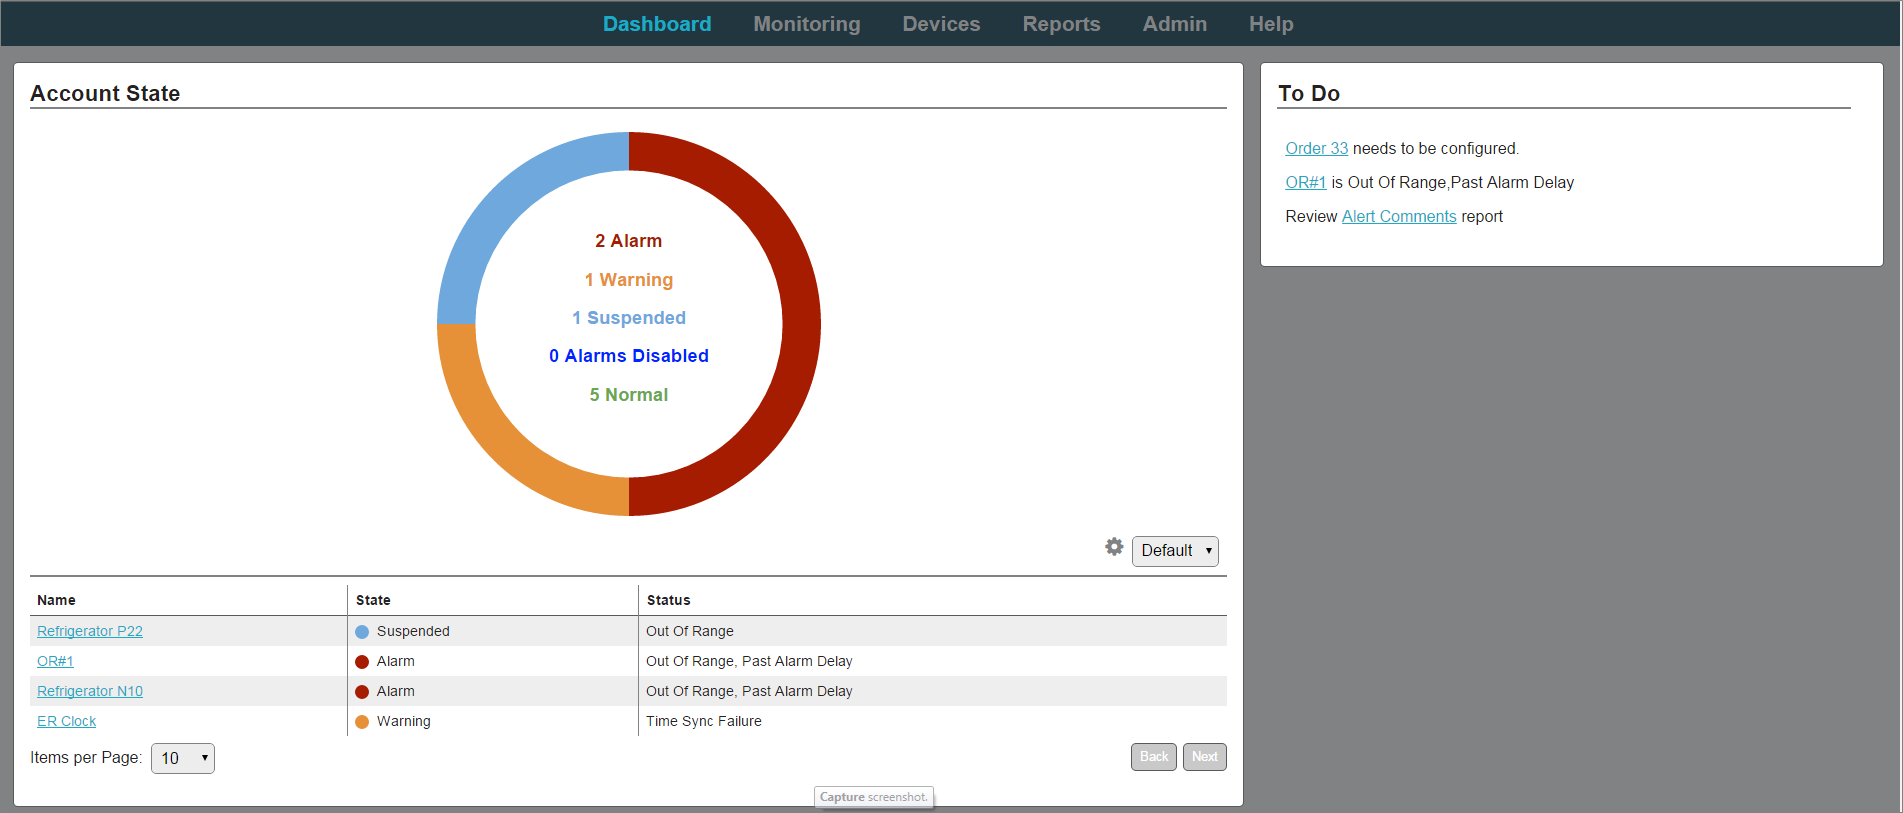
-
Out of Range Reading (Out of Range, Past Alarm Delay status)
Last transmitted reading is not within its configured Normal Condition (range).
-
Sensor cannot connect to a network (Unresponsive status, No Signal display on sensor)
The sensor has not checked into OneVue within the time period set in its Unresponsive Timeout setting.
The Unresponsive status is due to a network connectivity issue that has prevented the Primex device from checking-in to OneVue or the device has no power.
-
Probe removed from sensor device (No Probe status)
A probe been removed from a Temperature sensor or a Water Detector is removed from Water Leak Sensor, which has also resulted in no readings.
-
Sensor low battery (Low Battery status)
Sensor is reporting a low battery level. It's recommended to replace the batteries to prevent a loss of data or device operation
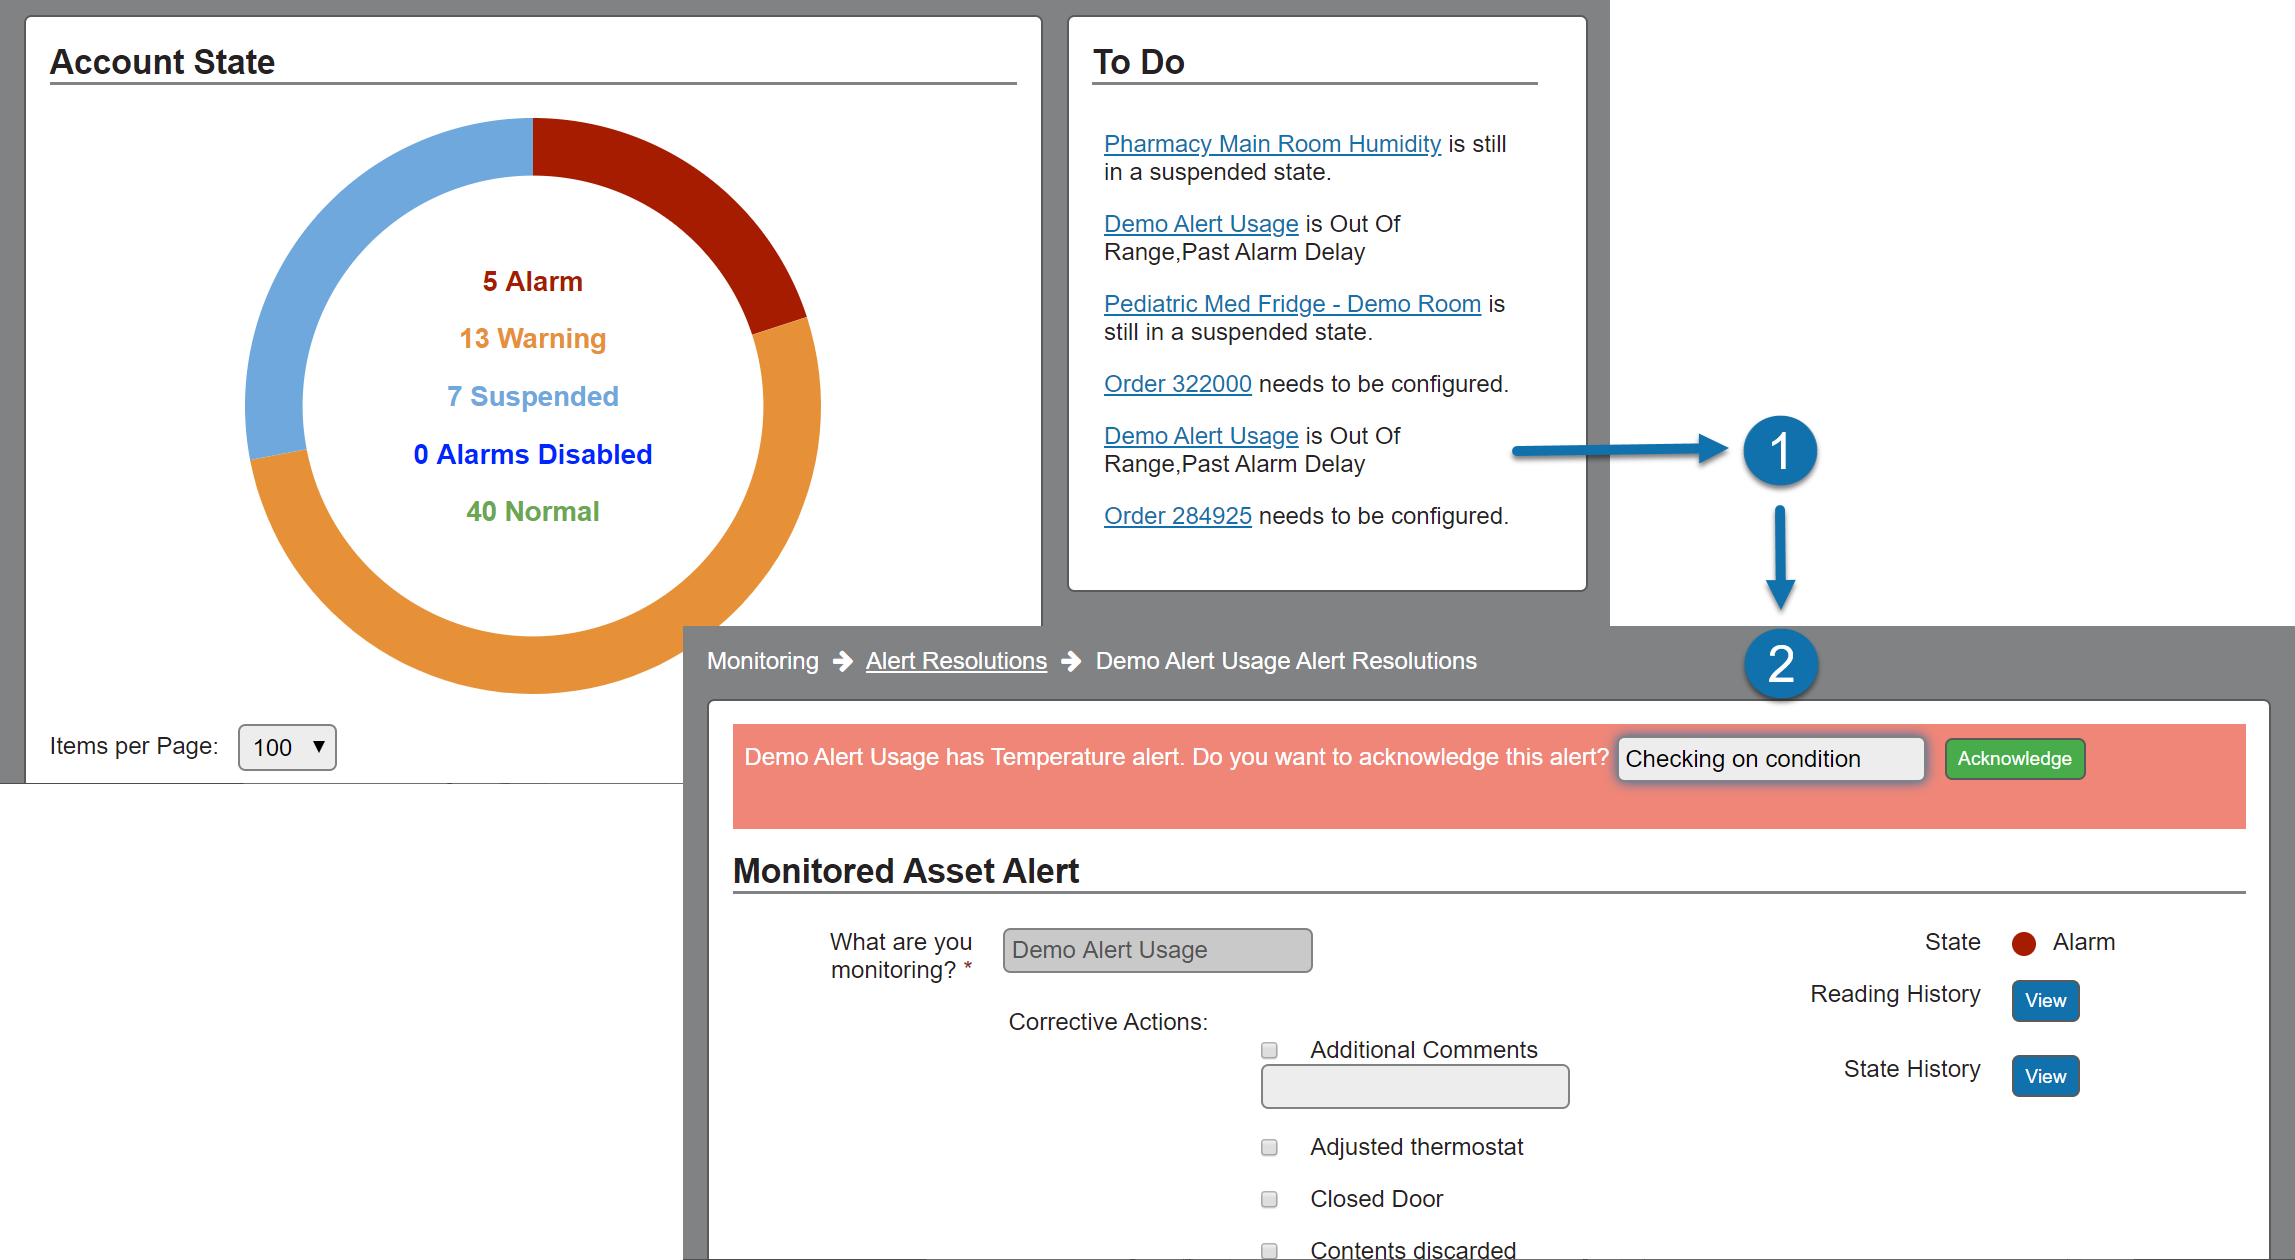
An Alert is activated when a Monitored Asset enters an Alarm state. When activated, the alert added to the Dashboard To Do list, alert notifications are sent to notify staff, and an Alert Resolution is created.
Acknowledging an alert temporarily suspends alert notifications and removes the alert from the To Do list.
Once acknowledged, alert notifications resume once the time period set in the Alert Rule's Resume Alert After setting has been reached. As an example, if an alert is acknowledged at 1:00 PM and the Resume Alert After setting is set to 1 hour, the alert notification resumes at 2:00 PM if the condition resulting in the alert continues to be in an Alarm state.
Go to the Dashboard > from the To Do list select the alert link. The Alert Resolution is displayed.
-
From the top RED section, enter a comment and select Acknowledge.
Alert acknowledgement history is available in a Monitored Asset's Event History and included in the Asset Summary Report.
From an Alert Resolution, you will document the corrective actions taken to resolve a Monitored Asset's Alarm state.
Go to Monitoring > Alert Resolutions. By default, last 31 days of resolutions displayed.
From the list, select the Name of the Monitored Asset. Alert Resolution is displayed.
-
Select one or more of the responses and add a comment. A comment may or may not be required.
If no responses are listed, select State History and add a comment to the Alarm state-change event that generated the alert.
Select Save.
All reading, state changes, and alert history is viewed from a Monitored Asset's profile.
Go to Monitoring > Monitored Assets.
Select the Name of the Monitored Asset.
From Reading History, select View.
Select a date range.
To view the readings in a list, select the checkbox Show Readings.
Event History is a comprehensive history of a Monitored Asset. The events include alert notifications, alert acknowledgments and comments, state-change events and comments, and logged alert resolutions.
You can review this information to understand what has happened with a given Monitored Asset.
Go to Monitoring > Monitored Assets.
Select the Name of the Monitored Asset.
From Event History, select View.
Select a date range.
The Centers for Disease Control and Prevention (CDC) January 2020 guidelines states that “Calibration testing should be done every one to two years or according to the manufacturer’s suggested timeline. TMDs can experience a “drift” over time, affecting their accuracy. This testing ensures the accuracy of the device continues to conform to nationally-accepted standards.”
As the manufacturer, Primex recommends replacement every 2 years from the “first date of use” rather than the “last date of testing”.
Probe replacement is recommended to be set under your account profile (Admin > Edit Account Name). Probe Replacement set to 2 years by default, options include every 1, 2, 5, or 10 years and Replace Based On the probe's first date of use (default) or last date of testing.
Probe Replacement Report provides days remaining to replacement for all OneVue Probes with CertiTrak.
OneVue Probe with CertiTrak NIST certificates are uploaded to OneVue upon first use. Certificates can be downloaded from a sensor's profile.
Go to Monitoring > Monitored Assets.
Select the Name of the Monitored Asset.
From the sensor section, select the Temperature link of the sensor.
Scroll to the bottom of the page and select the Probe Serial No. Its Probe NIST certification is displayed in a PDF file.
You can view, generate, and download reports containing the data collected by your Primex devices and additional monitoring data. Report Profiles, which are managed by an account admin, generate the reports available from the Reports menu.
The most common report types include:
-
Report provides the daily reading summary and the event history of Monitored Assets. The daily reading report data includes the calculated average, minimum and maximum readings of all readings for each day, the count of readings per day, and a summary for the report time period. The event history includes alert acknowledgments and comments, logged alert resolutions, and state-change comments.
-
Report provides lifespan data for OneVue Probes with CertiTrak. Probe data includes the first use date, last testing date, and days to replacement.
-
Alert Evaluation Report (applies to temperature monitoring only)
Report provides an analysis of temperature data and operating conditions collected by OneVue Temperature Sensors for the previous 7 days and recommendations based on the computed data. The report is designed to provide the information needed by staff to detect patterns and serve as a source of intelligent, computed data to support decisions or analysis of monitored temperature conditions.
Active reports are those reports generated manually, daily, weekly, or monthly (selected during report creation).
Go to Reports > Active.
To select the most recent report, from the Latest column select PDF or CSV (not all reports are available in a CSV format).
To view historical reports, from the History column > select View Reports > select a date range > select PDF or CSV.
You can electronically record the acknowledgment of report reviews. Designed to comply with the Code of Federal Regulations; Electronic Signatures (21 CFR Part 11).
Go to Reports > Active.
From the History column, select View Reports.
From the Status column, select the Not Reviewed for the report you want to acknowledge.
Enter a comment.
-
Select Save.
The Reviewed By, Date Reviewed, and Comment columns auto fill and the Review Status on the Reports; Active page change from Not Current to Current when all reports are acknowledged.